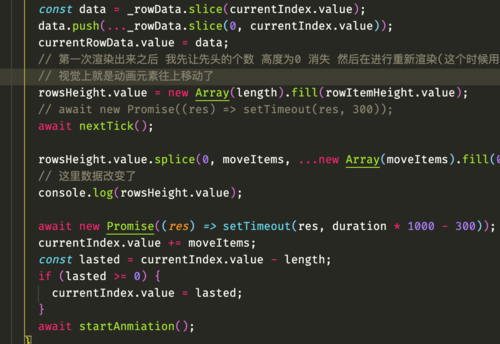
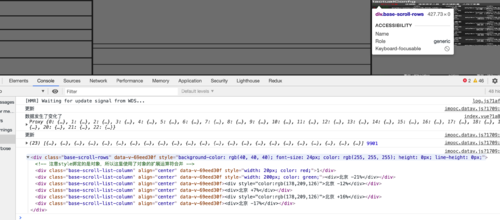
请问老师这里NextTick怎么无效

老师我想请问下,这里动画更新渲染的话。为什么这里的300ms的setTimeout不可以使用nextTick代替,我使用nextTick代替并没有效果。我理解是当currentRowData改变后同时复原高度等待DOM重新渲染后,在将顶部移动的item高度清0达到动画的效果,然后再次重新渲染重复这个步骤。请问老师这样为什么不可以,nextTick不也是等待页面Dom渲染完毕之后的操作,为什么使用nextTick就看不到动画展示的效果了。
正在回答 回答被采纳积分+3
3回答
<template>
<div
class="base-scroll-list"
ref="container"
>
{{actualConfig.moveItems}}actualConfig
<div
class="base-scroll-header"
:style="{'background-color':actualConfig.headerBg,'height':`${+actualConfig.headerHeight}px`,
fontSize:`${actualConfig.headerFontSize}px`,
color:actualConfig.headerColor}"
>
<div
class="header-item text"
v-for="(headerItem,index) in headerData"
:key="index"
:align="actualConfig.headerAlign"
:style="{width:`${headerWidth[index]}px`,...headerStyle[index]}"
v-html="headerItem"
/>
</div>
<div
class="base-scroll-rows-wapper"
:style="{height:`${wholeHeight - actualConfig.headerHeight}px`}"
>
<!-- 注意这里div的key 要求每次数据更新之后就重新渲染 -->
<!-- 如果使用rowIndex的话diff算法就会复用之前div 第一个高度就会从0变成72 -->
<!-- 使用不同的key直接渲染之前的div 那么就会进行transition变化 -->
<!-- 而使用不同的key值时 就会直接重新渲染不同的div 所以从0-72高度的变化过程就不会进行transition -->
<div
class="base-scroll-rows"
v-for="(rowData,rowIndex) in currentRowData"
:key="rowData.index"
:style="{backgroundColor:rowBgColor(rowData.index),
fontSize:`${actualConfig.rowFontSize}px`,
height:`${rowsHeight[rowIndex]}px`,
lineHeight:`${rowsHeight[rowIndex]}px`,
color:actualConfig.rowColor}"
>
<!-- 注意style绑定的是对象,所以这里使用了对象的扩展运算符合并 -->
<div
class="base-scroll-list-column"
v-for="(colData,colIndex) in rowData.value"
:style="{width:`${headerWidth[colIndex]}px`,...rowStyle[colIndex]}"
:key="colIndex"
:align="actualConfig.rowsAlign"
>
{{colData}}
</div>
</div>
</div>

</div>
</template>
<script>
import { ref, onMounted, nextTick, watch } from "vue";
import cloneDeep from "lodash/cloneDeep";
import assign from "lodash/assign";
import { useScreen } from "../../hooks/useScreen";
const mockData = [
["张三", "22", 10000],
["李四", "24", 15000],
["王浩羽", "26", 24000],
["王浩羽1", "26", 24000],
["王浩羽2", "26", 24000],
["王浩羽3", "26", 24000],
["王浩羽4", "26", 24000],
["ddd", "26", 24000],
["xxx", "26", 24000],
["aaa", "26", 24000],
];
const defaultConfig = {
headerData: ["姓名", "年龄", "月薪"],
headerStyle: [{ color: "red", width: "200px" }],
headerBg: "rgb(90,90,90)",
headerHeight: 48,
headerIndex: true,
headerIndexContext: "#",
headerAlign: "center",
headerFontSize: 32,
headerColor: "#fff",
headerIndexContextStyle: {
color: "green",
width: "20px",
},
data: mockData,
rowNumber: 10, // 每页显示行数
// 序号列内容的样式
rowIndexStyle: {
color: "red",
},
// 表体样式
rowStyle: [{ color: "green" }],
// 奇偶行背景颜色
rowBg: ["rgb(40,40,40)", "rgb(55,55,55)"],
rowFontSize: 28,
rowColor: "#000",
rowsAlign: "center",
moveItems: 1,
duration: 2,
};
export default {
name: "BaseScrollList",
props: {
config: {
type: Object,
default: () => {},
},
},
setup(props, ctx) {
const container = ref(null);
const actualConfig = ref({});

const headerData = ref([]);
const headerStyle = ref([]);
const headerWidth = ref([]);

const rowStyle = ref([]);
const rowsData = ref([]); // 总的
const currentRowData = ref([]); // 当前展示
const currentIndex = ref(0);
const rowItemHeight = ref(0); // 每行行高
const rowsHeight = ref([]); // 数组 行高
const wholeHeight = ref(0);

// 处理props Header逻辑
const handleConfigHeader = (config) => {
const _headerData = cloneDeep(config.headerData);
const _headerStyle = cloneDeep(config.headerStyle);
const _rowStyle = cloneDeep(config.rowStyle);
if (!_headerData?.length) return;
if (config.headerIndex) {
_headerData.unshift(config.headerIndexContext);
_headerStyle.unshift(config.headerIndexContextStyle);
_rowStyle.unshift(config.rowIndexStyle);
}
headerData.value = _headerData;
headerStyle.value = _headerStyle;
rowStyle.value = _rowStyle;
const { width, height } = useScreen(container.value);
computedHeaderArea(width, height);
};

// 处理props Data逻辑
const handleConfigData = (config) => {
rowsData.value = config.data || [];
if (config.headerIndex) {
// 处理序号列
rowsData.value.forEach((item, index) => {
item.unshift(index + 1);
});
}
// 计算高度
computedHeight(config);
};

// 奇偶列背景颜色
const rowBgColor = (index) => {
const bgColor =
index % 2 === 0
? actualConfig.value.rowBg[0]
: actualConfig.value.rowBg[1];
return bgColor;
};

// 计算表体高度
const computedHeight = (config) => {
const { width, height } = useScreen(container.value);
const { headerHeight, rowNumber } = config;
const unUsedHeight = height.value - headerHeight;
// rowHeight.value = Math.floor(unUsedHeight / rowNumber);
// 可删除变量 rowHeight
const rowHeight = Math.floor(unUsedHeight / rowNumber);
rowItemHeight.value = rowHeight;
rowsHeight.value = new Array(rowsData.value.length).fill(rowHeight);
};

// 计算表头宽度/高度
const computedHeaderArea = (width, height) => {
let useWidth = 0;
let useCount = 0;
const length = headerData.value.length;
const _headerStyle = headerStyle.value;
// 查找是否存在自定义width
_headerStyle.forEach((style) => {
// 存在 按照自定义width判断
if (style.width) {
// 计算自定义宽度总数和总个数
useWidth = +style.width.replace("px", "");
useCount++;
}
});
// 动态计算列宽时 使用剩余的宽度除以剩余列数
const _widthCount = Math.floor(
(width.value - useWidth) / (length - useCount)
);
const arrayWidth = new Array(length).fill(_widthCount);
// 计算结果后再次循环 替换arrayWidth
_headerStyle.forEach((style, index) => {
// 存在 按照自定义width判断
if (style.width) {
// 替换对应宽度
arrayWidth[index] = +style.width.replace("px", "");
}
});
headerWidth.value = arrayWidth;
};
// 初始化整体数据 需要做额外兼容处理
const initRowData = (rowNumber, data) => {
const length = data.length;
if (length > rowNumber) {
return data.map((i, idx) => {
return {
value: i,
index: idx,
};
});
}
if (length * 2 > rowNumber) {
const newData = [...cloneDeep(data), ...cloneDeep(data)];
return newData.map((i, idx) => {
return {
value: i,
index: idx,
};
});
}
};
// 经典基础算法 滚动算法
const startAnmiation = async () => {
const { rowNumber, moveItems, duration } = actualConfig.value;

const _rowData = initRowData(rowNumber, rowsData.value);
const length = _rowData.length;

if (length < rowNumber) {
currentRowData.value = _rowData;
} else {
// 开启动画
const data = _rowData.slice(currentIndex.value);
data.push(..._rowData.slice(0, currentIndex.value));
currentRowData.value = data;
// 第一次渲染出来之后 我先让先头的个数 高度为0 消失 然后在进行重新渲染(这个时候用户无法察觉变化)
// 视觉上就是动画元素往上移动了
rowsHeight.value = new Array(length).fill(rowItemHeight.value);
// 先重新渲染 0.3s 后 进行动画展示
// 这个Promise 更新页面
// await new Promise((res) => setTimeout(res, 300));
// 使用nextTick的话 第一次页面渲染之后 直接就将height变为了0
await nextTick(); // 为什么这里不可以?
// 页面已经更新了 开始进行动画
rowsHeight.value.splice(0, moveItems, ...new Array(moveItems).fill(0));
// 动画 0.3s后结束 等待1s后 更改currentIndex的值 其实也就是延迟渲染 不然就会立马渲染
await new Promise((res) => setTimeout(res, duration * 1000));
currentIndex.value += moveItems;
const lasted = currentIndex.value - length;
if (lasted >= 0) {
currentIndex.value = lasted;
}
await startAnmiation();
}
};

const update = () => {
const _config = assign(defaultConfig, props.config);
// 拿到总高度
const { height } = useScreen(container.value);
wholeHeight.value = height.value;
handleConfigHeader(_config);
console.log(rowsHeight.value, " rowsHeight.value ");

handleConfigData(_config);
actualConfig.value = _config;
// 开启动画
startAnmiation();
};

watch(
() => props.config,
() => {
console.log("更新");
update();
},
{
deep: true,
}
);

onMounted(() => {
update();
});

return {
container,
headerData,
headerStyle,
actualConfig,
headerWidth,
rowsData,
currentRowData,
rowsHeight,
rowStyle,
rowBgColor,
wholeHeight,
};
},
};
</script>
<style lang="scss" scoped>
.base-scroll-list {
height: 100%;
width: 100%;
}
.base-scroll-header {
display: flex;
align-items: center;
.text {
white-space: nowrap;
overflow: hidden;
text-overflow: ellipsis;
}
.header-item {
padding: 0 10px;
box-sizing: border-box;
}
}
.base-scroll-rows-wapper {
overflow: hidden;
.base-scroll-rows {
overflow: hidden;
transition: all 0.3s linear;
display: flex;
.base-scroll-list-column {
padding: 0 10px;
box-sizing: border-box;
display: flex;
flex-direction: column;
justify-content: center;
}
}
}
</style>
扬_灵
2020-10-09 17:33:03
同学你好,首先await new Promise(resolve => setTimeout(resolve, waitTime))这段代码只是在设置所有行高度和设置隐藏行的高度为0的时候增加的时间间隔,使用await nextTick()是可以的的,而且我们在css样式中设置了 transition: all 0.3s linear;而且动画运动的关键代码是await new Promise(resolve => setTimeout(resolve, duration - waitTime)),可以把你的代码上传一下吗,我在本地帮你定位一下问题。
-
请问老师关于你说的await new Promise(resolve => setTimeout(resolve, waitTime))这段代码设置高度为0的时间间隔我不是很明白,代码执行到await new Promise(resolve => setTimeout(resolve, waitTime))的时候,只有这个Promise在waitTime后才会执行rowsHeight.value.splice(0, moveItems, ...new Array(moveItems).fill(0));将高度变为0.这300ms的时间js相当于是空闲挂起状态吧。
相似问题
vuex nextTick 使用
2626
0
7


疑惑对老师解答的nexttick
1195
0
3


Bug:login page keep loading
509
2
2


老师关于nextTick是微任务
1500
0
4


关于dp无后效性分析
3508
1
9


登录后可查看更多问答,登录/注册
问题已解决,确定采纳
还有疑问,暂不采纳


